

How to write to NTFS formatted external HDD on your Apple Mac
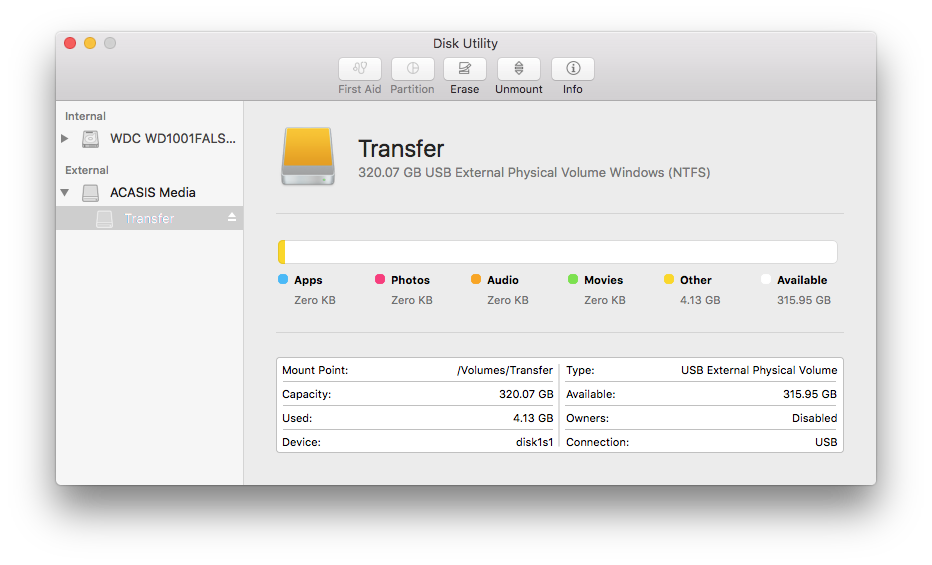
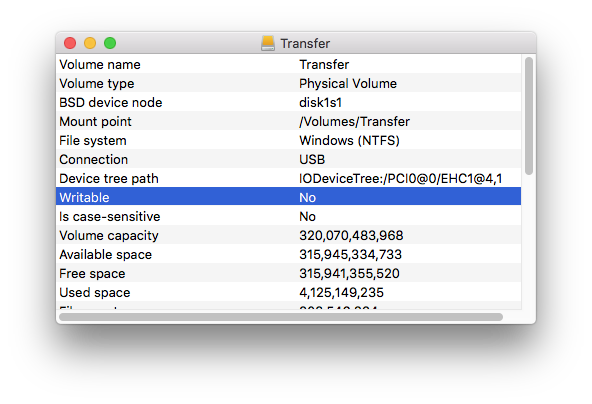
There are times when you plug in your friend's external hard drive on the iMac or Macbook Pro, you can only read the drive but cannot transfer your files to the external hard drive. You will see the File System is Windows(NTFS) if you go to Disk Utility -> Info
So how can we enable the write access to the NTFS file system?
But first if you have both Mac and Windows computers at home, and need to regularly copy files between Mac and Windows, we recommend you format the USB drive(either USB HDD or USB sticks) to FAT32 or exFAT. Please note FAT32 has the limit of 4GB on single file size and 2TB of partition limit. Or you might consider just transfer your files through network.
Here we only discuss free solution for the write access to NTFS. There are commercial programs doing the job, but that's not today's topic.
We have two options:
1. Enable Apple's native NTFS driver's built in write access
2. Install an open-source NTFS driver: NTFS-3G
There are, however, advantages and disadvantages for the two options. The advantage of using Apple's built in NTFS driver, you don't need to install third party program and less security risk. But the down side of it is the Disk will not come up automatically as the Apple's NTFS write access is not officially supported, you will have to open Finder and go to /Volumes to open the Disk. And also it only targets individual Disk, which means if you plug in another NTFS formatted drive, you need to enable the second drive again. NTFS-3G is an open source cross-platform implementation of the NTFS file system with read-write support. It's been running on Linux, FreeBSD, OpenSolaris and Mac OS X and is very stable. To install NTFS-3G on Mac is a little bit complicated for ordinary Apple user.
Turn on Apple's built in NTFS write support
Apple's native NTFS driver handles read flawlessly, yet write support has not been supported officially, though the write support is built in to the driver itself and it's disabled by default.
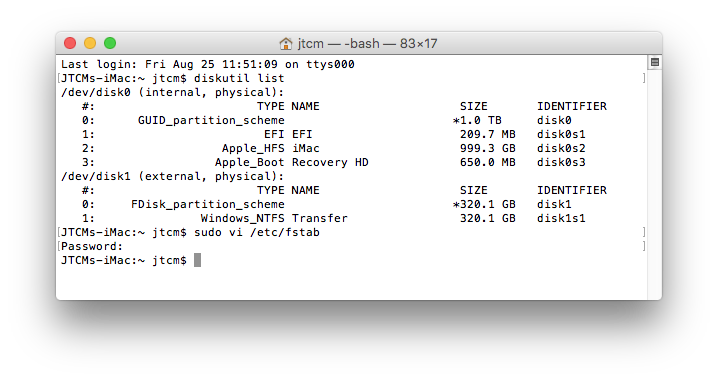
To do this, you will need to open Terminal:
1. diskutil list
2. sudo vi /etc/fstab
3. add below line in this file
LABEL=Transfer none ntfs rw,auto,nobrowse
Transfer is the disk name in my case, you need to type in the volume name you see in command diskutil list and use \040 as space if your volume name has space in it.
Then, umount and re-mount the disk. You won't see your disk in the Finder due to the "nobrowse" option is required for NTFS write access and it prevents the disk showing in Finder.
You might open Finder and go to menu Go -> Go to the Folder and then type in "/Volumes" without the quotes, alternatively if you are still in Terminal, you can type in "open /Volumes" without the quotes to access your disk.
Install NTFS-3G to enable write access to NTFS formatted drive
Open Terminal
1. Install Homebrew and type in the following command or go to http://brew.sh/ to check the latest version
/usr/bin/ruby -e "$(curl -fsSL https://raw.githubusercontent.com/Homebrew/install/master/install)”
2. brew tap caskroom/cask
3. brew cask install osxfuse
4. brew install ntfs-3g
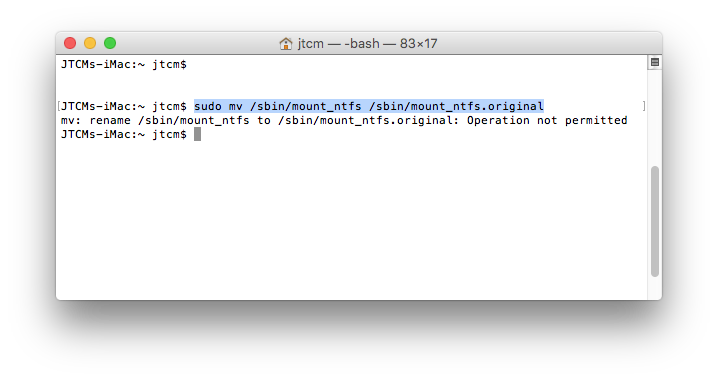
After the installation what we normally do is replacing the Apple's mount_ntfs with NTFS-3G's driver by doing this:
sudo mv /sbin/mount_ntfs /sbin/mount_ntfs.original
But it's not going to work in El Capitan and Sierra due to SIP (System Integrity Protection), you will receive the error message "Operation not permitted" like this:
Next, we need to restart the Mac and boot with Recovery disk and disable SIP and reboot again:
csrutil disable
reboot
sudo mv /sbin/mount_ntfs /sbin/mount_ntfs.original
sudo ln -s /usr/local/sbin/mount_ntfs /sbin/mount_ntfs
reboot to Recovery again and
csrutil enable
You can do everything in Recovery mode, but be careful with the location, it will not be the same as above.